

INTRODUCTION
In today's free PostgreSQL lesson, we will go over all the necessary installation steps for PostgreSQL, and we will create a new database so that in the next free lesson, we can import data into tables and examine basic SQL query commands.
POSTGRESQL INSTALLATION
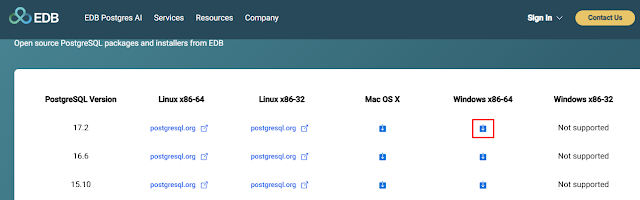
To begin with, we should go to https://www.enterprisedb.com/downloads/postgres-postgresql-downloads and click on the Windows icon (assuming you have Windows Operating system) to download the latest version of PostgreSQL.
We double-click on the file we just downloaded to start the installation process. Then, we click "Next" in the "Setup – PostgreSQL" window that will appear.

In the "Installation Directory" window, you can accept the suggested directory for installing PostgreSQL and click "Next" to proceed to the next step.

Immediately after, the "Select Components" window will appear, where you can choose if you want to install additional utilities along with PostgreSQL, such as the graphical Administration Console (pgAdmin 4). Do not select Stack Builder because if you are running multiple databases from different ventors the installation will fail on Windows. Stack Builder among other things can automatically download the jdbc (java) drivers for us but this is an easy task that we can do on our own. Click the Next Button to continue with the installation.

One of the last options you'll need to accept during the PostgreSQL installation is the directory where the database (or databases) data will be stored. For our examples, we can accept the suggested directory, but in a production environment, it's better to store the data files on a different drive. This not only improves the performance and speed of the database but also ensures easier data recovery in case something goes wrong. We will discuss this topic in more detail in future free PostgreSQL lessons. For now, simply accept the directory suggested by the PostgreSQL installation process in the "Data Directory" window and click "Next."

Ιn the "Password" window, you will need to set a password for the superuser, which is named "postgres." With this username and password, you'll be able to connect to PostgreSQL through pgAdmin 4 or via code in languages like Java or Python. Since this user has full privileges on PostgreSQL, it's common in production environments to create a second user with fewer privileges. So, set a password that you can easily remember and click "Next."

In the "Port" window, you should accept the suggested port or specify a new one that is not already in use by Windows. Typically, we leave this port as is, since there is usually no other known application using the same port. So, accept the default port 5432 and click "Next."

In the "Advanced Options" window, we can choose the language in which we will write and input data into our tables. Based on the Locale we select, PostgreSQL will set the appropriate sorting rules and formatting for numbers, characters, etc. Since the data we will input will be in English, the suggested default locale will work perfectly for us. So, we accept the selection and click "Next."

We are now ready to begin the installation. The "Pre Installation Summary" window shows all the choices we made in the previous steps, and based on these selections, the installation will proceed. Click "Next" to continue.

The "Ready to Install" window is a final confirmation that you agree with all your selections. Simply click "Next" and the installation will begin.

Wait a few minutes until the process is complete.

Once the installation is complete, the "Completing the PostgreSQL Setup Wizard" window will appear. Click "Finish" to exit the setup.

PostgreSQL has been installed, but PostgreSQL itself is not a database—it's a database management system. So, the next step is to create a database. We can do this in two ways: (a) using command-line commands from the terminal, or (b) through the graphical interface using pgAdmin 4. Let's follow the second method.
pgAdmin 4 is a graphical console for managing PostgreSQL databases. It does a lot more, but for now, we're focused on how to create a database. Let's go ahead and start pgAdmin 4.


Under the Connection tab, make sure you fill in the hostname, which in our case will be localhost, and the password. To avoid retyping the password each time you connect to the database, you can enable the Save password option. Click the Save button when you are done.


On the Create-Database window, just enter the name of new database that you like to create. In my case I have named JakartaEEDB. Click on the Save button to complete the database creation process.


You can name this database Northwind and click on the Save button to create it.


Now that we have the database, we want to create tables and insert data to them. For this purpose, we will use a database that Microsoft had created few years ago for educational purposes and named it Northwind. In order to transfer this database to a PostgreSQL environment, we will need to go to GitHub where a team of developers created an SQL script that is compatible with PostgreSQL. Open the Northwind.sql file and copy all the commands it contains.
https://github.com/pthom/northwind_psql

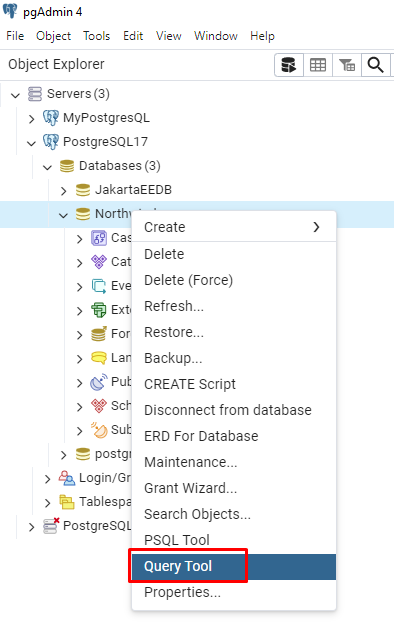
Once we have copied the contents of the Northwind.sql file, we return to the pgAdmin 4 environment, and after right-clicking on the Northwind database, we select Query Tool.
In the Query Editor, paste the contents of the Northwind.sql. Click on the Execute Script icon.

If you expand the Tables icon, under the public schema, you will discover that the execution of the script has created 14 new tables with data on them.

What exactly data the Northwind database represents will be covered in the next free PostgreSQL lesson when we start talking about simple SELECT statements. For now, let's just remember that we have a database named Northwind, which contains tables with data.
Don’t forget to make a small donation so that this blog can grow even more and have more capabilities for delivering free online lessons.


0 Comments
What do you think about Ground of Code?